How to Using U Disk to Sync OneNote Notebooks?
Create U Disk Notebook in OneNote 2010 in Windows XP
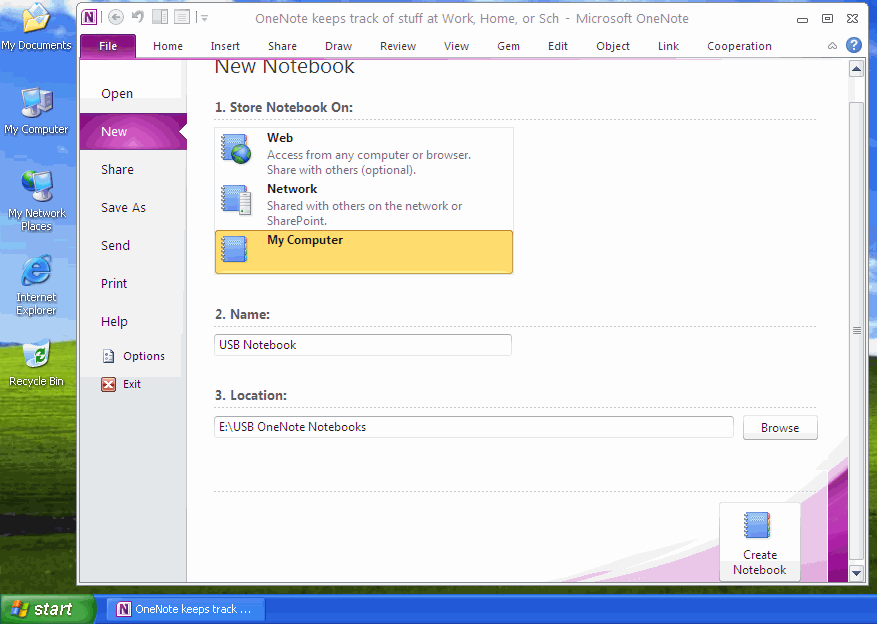
In this example, we using OneNote 2010, create new notebook in U Disk in Windows XP.
Steps: OneNote 2010 -> "File" -> "New" -> "New Notebook"
OneNote will create notebook into U disk.
In this U disk notebook, OneNote will save all the modify data into U disk when create new or edit page.
In this example, we using OneNote 2010, create new notebook in U Disk in Windows XP.
Steps: OneNote 2010 -> "File" -> "New" -> "New Notebook"
- Store Notebook On: My Computer
- Name: USB Notebook
- Location: navigate to U disk: E:USB OneNote Notebooks
- Finally, click "Create Notebook" button.
OneNote will create notebook into U disk.
In this U disk notebook, OneNote will save all the modify data into U disk when create new or edit page.
Using OneNote 2013 to Open U Disk Notebook in another Computer
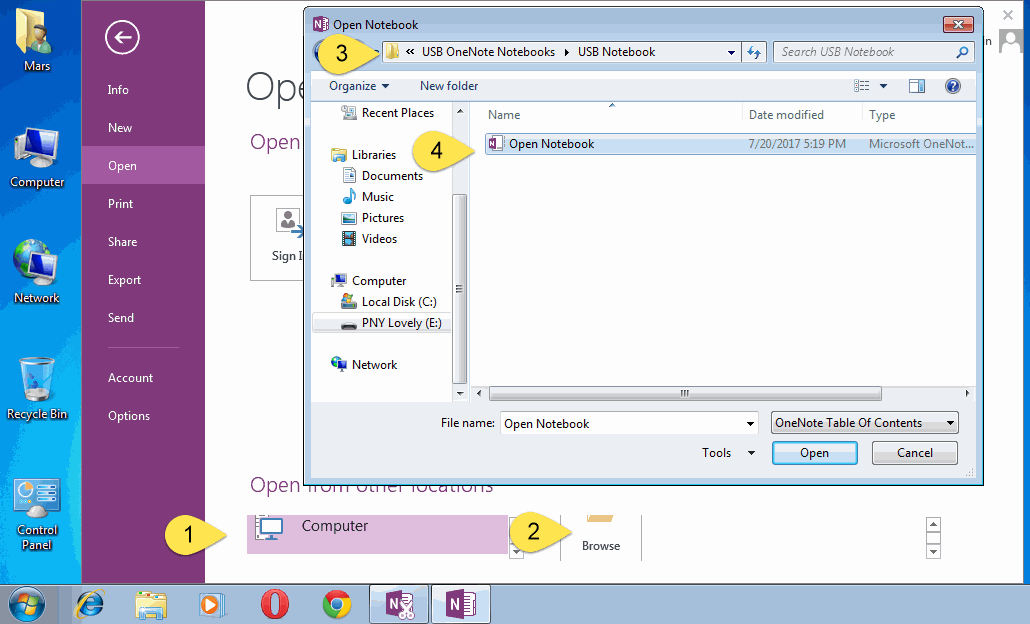
Plus this U disk into another Windows 7 computer, and open this U Disk notebook by OneNote 2013 in this computer.
Plus this U disk into another Windows 7 computer, and open this U Disk notebook by OneNote 2013 in this computer.
- OneNote 2013 -> "File" tab -> "Open" -> "Open from other locations" -> "Computer"
- Click "Browse" button.
- Browse to U disk
- Find the "Open Notebook" file, double click to open.
New Page and Modify Page in U Disk Notebook
After open a notebook from U Disk.
We can create new page, edit page and delete page in this U disk notebook. OneNote will save result into U disk directly.
After open a notebook from U Disk.
We can create new page, edit page and delete page in this U disk notebook. OneNote will save result into U disk directly.
Edit U Disk Notebook in Multiple Computers
Carry with this U disk, plush it into multiple computers, and open this notebook directly to edit it, achieve a synchronization effect.
Carry with this U disk, plush it into multiple computers, and open this notebook directly to edit it, achieve a synchronization effect.


